
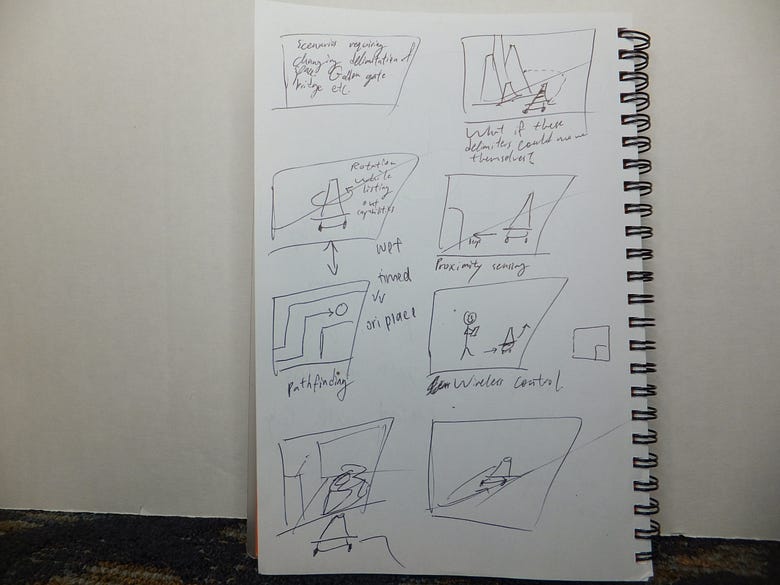
Concept
The SpaceMaker bot started out as a concept to tacitly encourage social distancing. During the currant pandemic, everyone is constantly inundated with messages to maintain their distance. However, this system could use improvements. After months of hearing the same message, people get fatigued. Additionally, there is a natural impulse for humans to move closer when interacting or working together.
Instead of relying on explicit warnings to maintain social distance, could we instead rely on innate social behaviours to achieve the same outcome? One instinct that humans have is to avoid moving objects, or to step away from objects that are steadily moving towards you. Another instinct is to follow the directions given by certain learned authoritative forms such as traffic signs. With SpaceMaker, we leverage the fact that traffic cones are used around the world to control movement as our means to tacitly encourage social distancing in an area.
However, as can be seen from the demo video, SpaceMaker has evolved beyond the scope of social distancing. It has become an exploration of automating and enriching the possibilities of space delimitation in both public and private spaces, for both traffic control (such as for reversible lanes) and control of human movement.
Iteration #1 — Moving the robot and initial designs
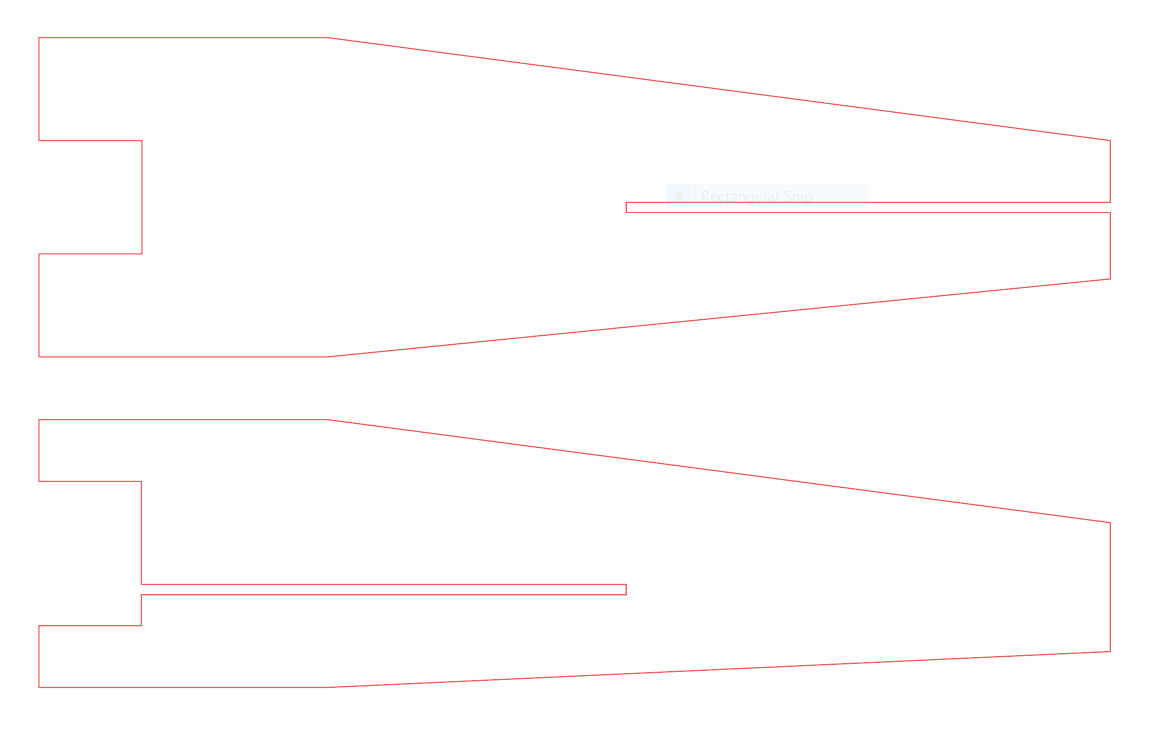
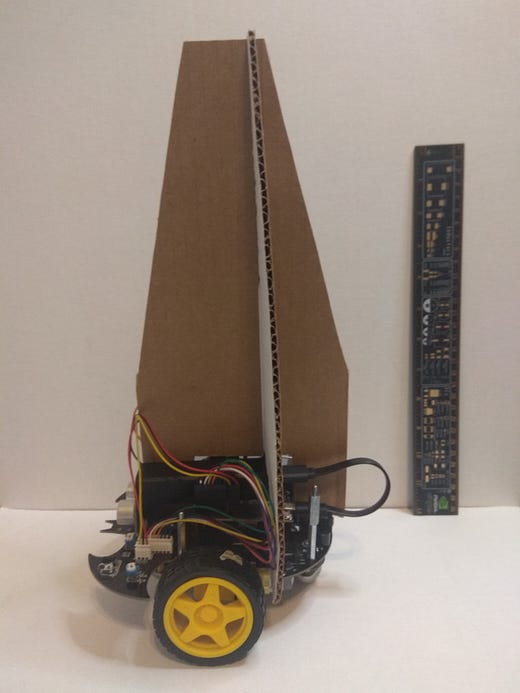
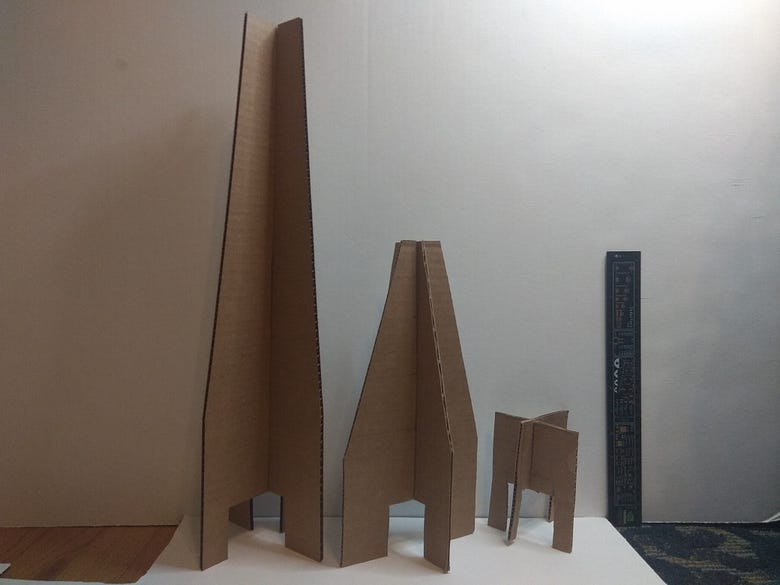
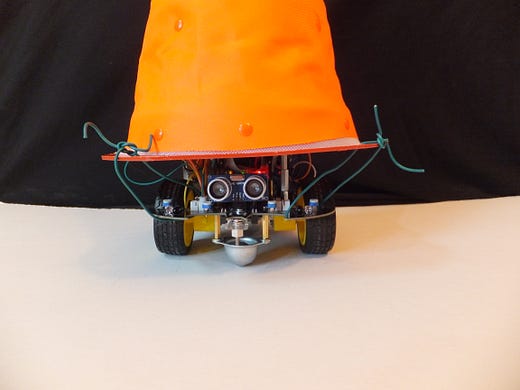
As a start, we received a robotic base that was already wired and came with its own DC motors. Our first step was to figure out how to make it move, and what form we want it to take on. Movement and distance sensing was solved by testing the effects of pin outputs one by one. As for the form, we wanted to make something tall and noticeable that could be mounted onto the robot. After making some cardboard prototypes with a precision knife, we settled on the cutout pattern included above for laser printing.
At this stage we experimented with many different heights of mounts to see what the limit was before SpaceMaker became too unstable.
Additionally, to explore the various movement patterns that SpaceMaker could employ to encourage social distancing, we tried the following movement modes.
Tacit Space Maker Mode
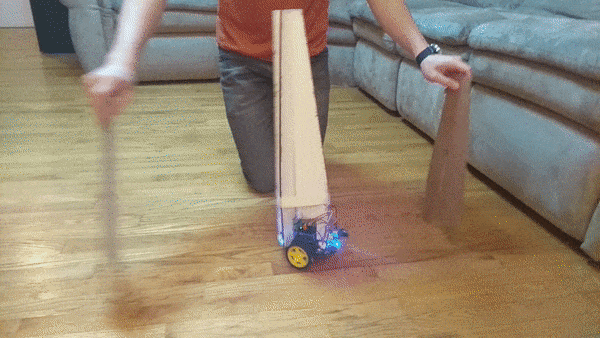
In Tacit Space Maker mode, SpaceMaker rotates until it finds two people standing too close too each other. It then repeatedly moves back and forth between the two people to encourage them to move apart.
Gantry mode
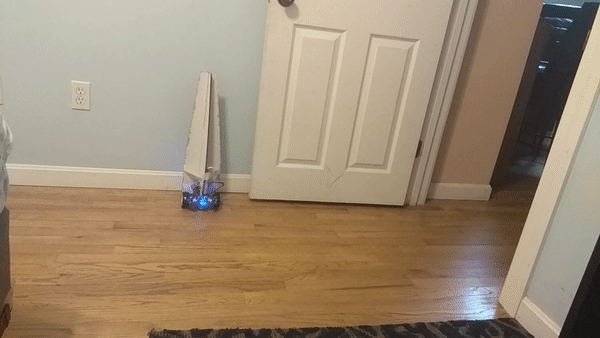
In Gantry mode, SpaceMaker waits until someone crosses its path. It then moves to the position that the person occupied, and waits there for a few seconds before moving back to its original position. This is meant to discourage people from following too closely behind someone else and can be used in places like entrances to buildings, or in front of elevators and escalators.
Iteration #1.1 Reliable ultrasound distance sensing
One drawback of the ultrasound sensors we were using is that they’re really only mostly accurate within a certain distance. Thankfully this is familiar territory in machine learning and probabilistic methods where we have algorithms that are only probably approximately correct.
Let’s say that at some time step t we have a true distance x that produces noisy ultrasound readings y ~ Normal( x, some variance). These seem like valid assumptions to make, and if our readings do indeed follow this distribution, then we can take advantage of the Law of Large Numbers to estimate x by taking the average of all the ultrasounds readings y at time t. As the number of readings we take increases, the variance of our average decreases and we converge to the true distance x. However, we don’t want to carry out too many readings because each reading takes awhile to complete, which slows down our robot’s reaction time. So if our assumptions are valid, the Central Limit Theorem kicks in very fast when we sample from a normal distribution, and we only need a handful of readings to make a good estimation. Our improved ultrasound sensor performs as follows.
int get_distance(int cur_trig, int cur_echo) {
  int sum = 0;
  int n_trials = 15;
  // fire the ultrasound multiple times and take the minimum reading
  for (int a = 0; a < n_trials; ++a) {
    int distance = fire_ultrasound(cur_trig, cur_echo);
    sum += distance;
  }
  return distance / n_trials;
}
We could have also explored using a hidden markov model with the true distance as the latent variable, and the ultrasound reading as the observed variable. Our true distance is allowed to change from state to state, but every true distance is correlated with the previous true distance. Moreover, ultrasound readings are correlated with the true distance at that point in time. We could even combine this method with the averaging method above. These dependencies should give us a model that’s resilient to noisy ultrasound readings. It would be interesting to see how accurate we could make our ultrasound readings using computation alone, but that’s an experiment for another time.
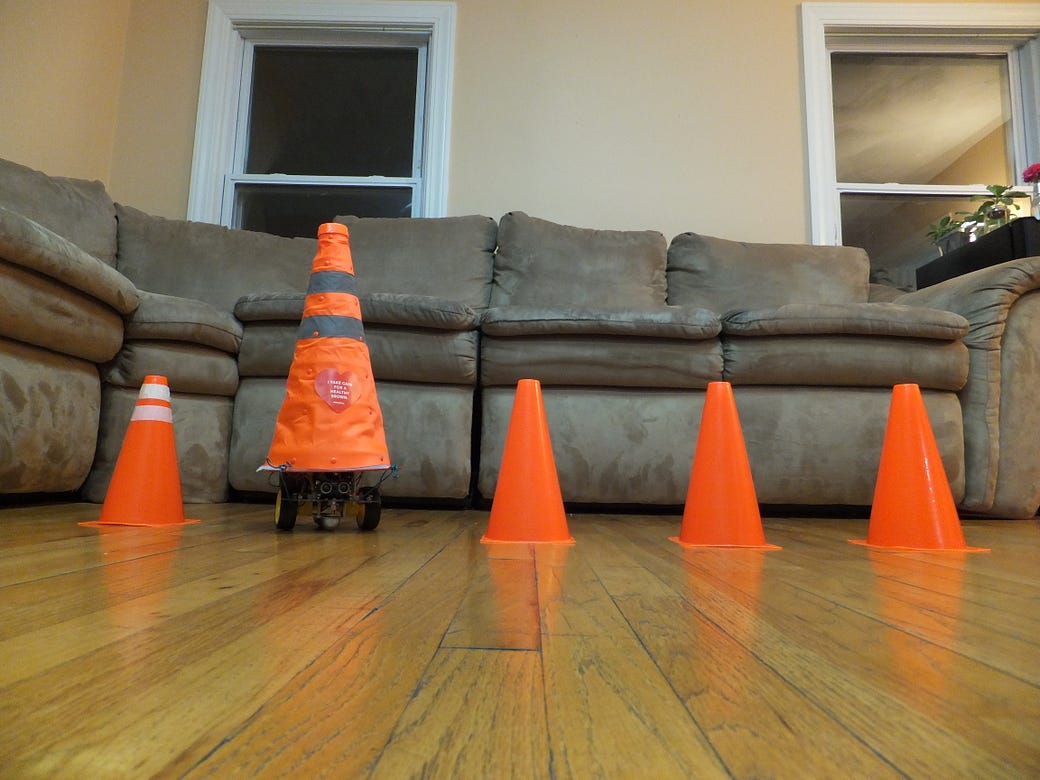
Iteration #2 — Traffic cones and experimenting with form
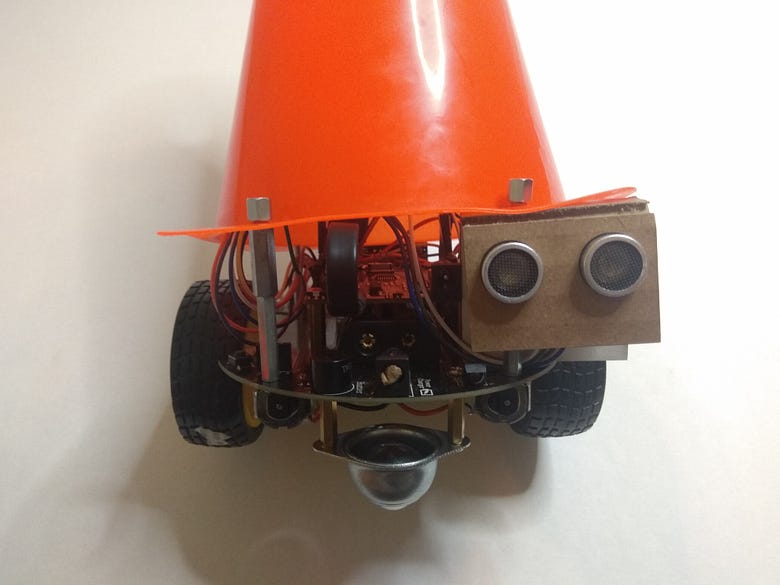
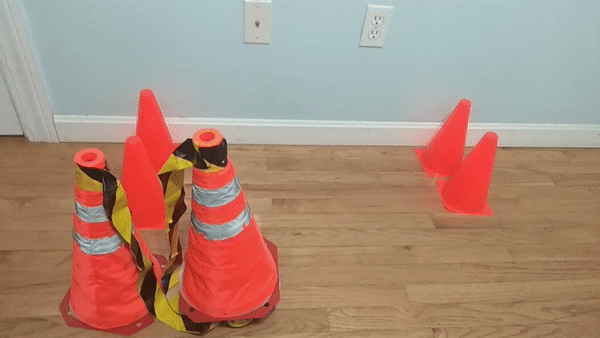
After our first iteration, I immediately received feedback that the outward appearance of the robot could be improved. As it was now, it wasn’t very readable in terms of how people should respond to it. It was suggested that perhaps covering the robot with a traffic cone would be perfect in terms of signalling to people that they should maintain their distance. We immediately acquired a set of 9 inch traffic cones to play around with this idea.
It was around this time that I also started working with a second robot.
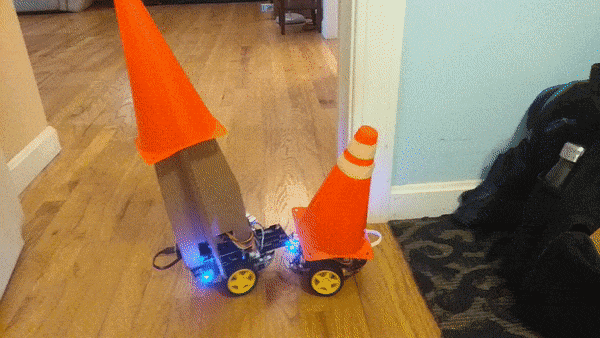
We continued experimenting with the form of SpaceMaker by using traffic cones of larger and larger sizes. Unfortunately, while 12-inch traffic cones started to reach the point where Spacemaker was properly covered up, we found that the motors were unable to keep up with the load.
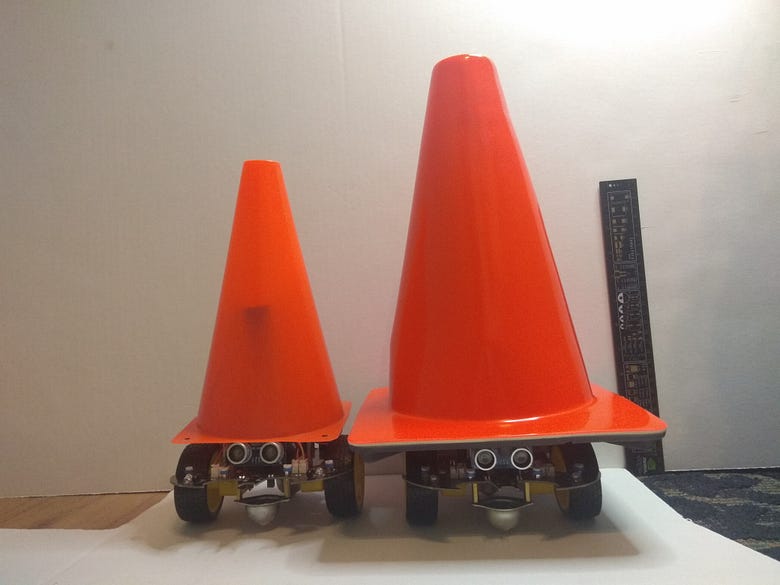
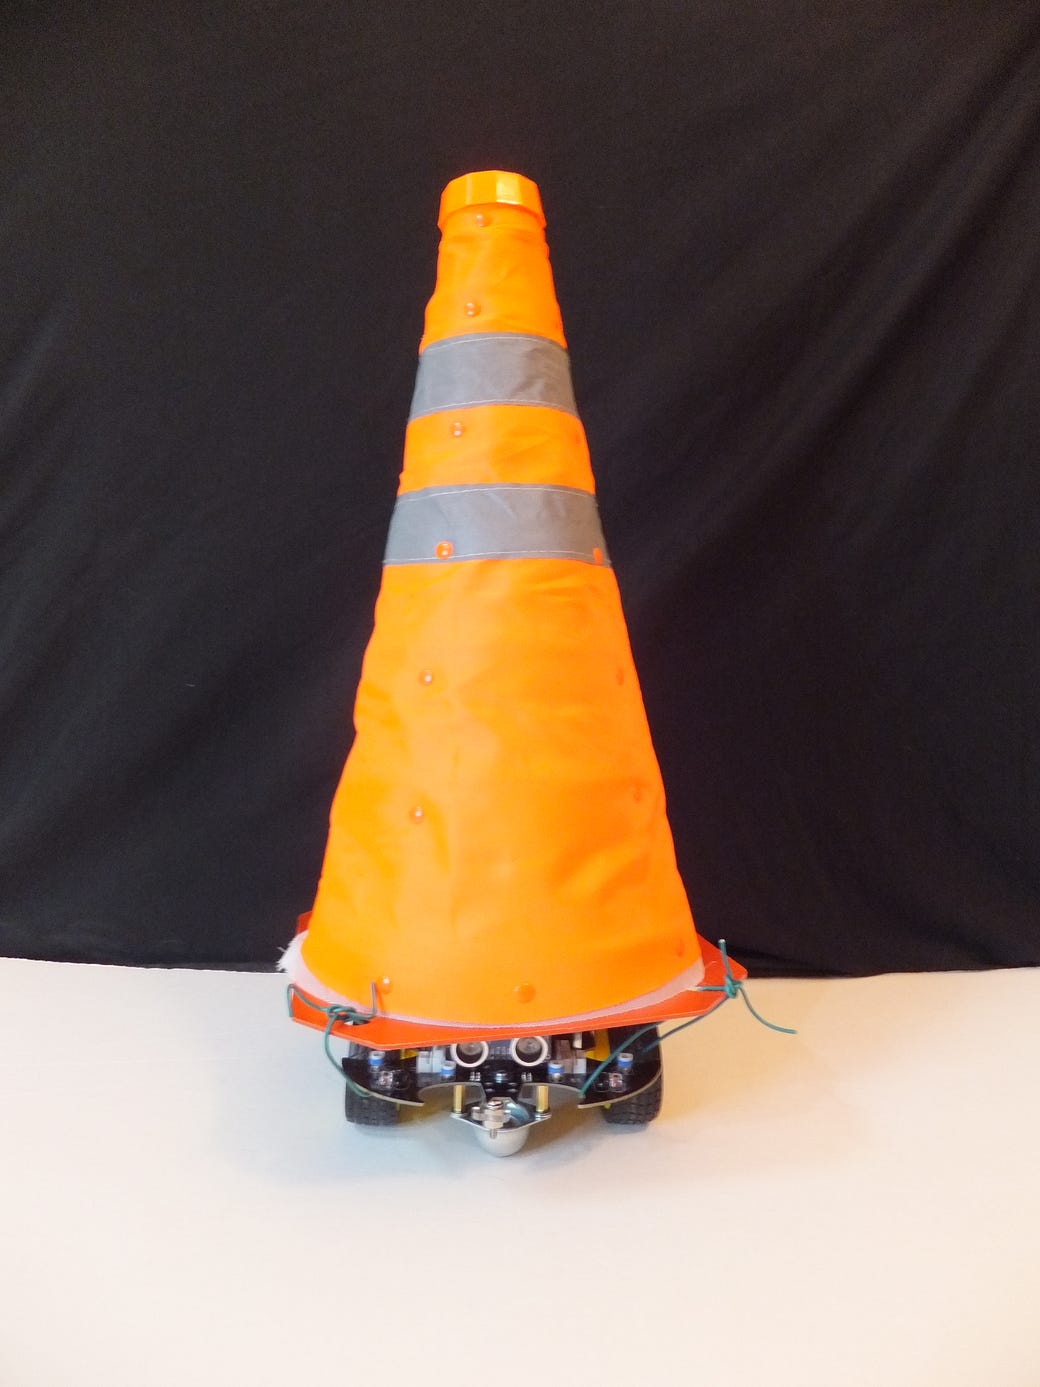
And so we switched from plastic cones to cloth cones to decrease the load. This helped, but not enough to allow SpaceMaker to move.
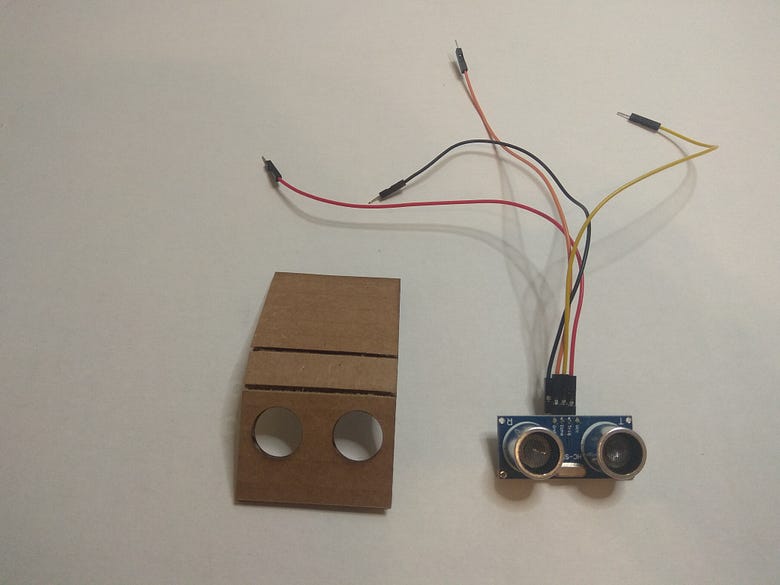
Iteration #2.1 Adding a second ultrasound sensor
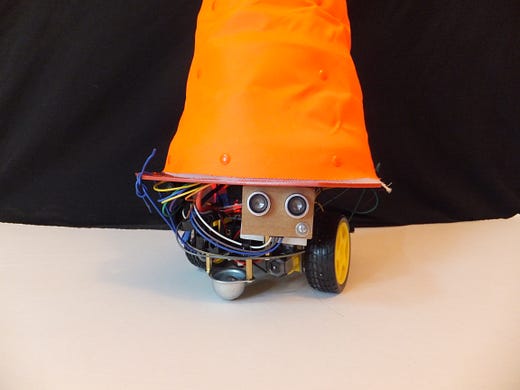
From the very first sketch it was apparent that keeping track of distances in multiple directions would be extremely helpful for maintaining equidistance. In terms of wiring another ultrasound sensor to the Arduino, this wasn’t any different from setting up the first ultrasound sensor. The main challenge here was laser cutting a holder to provide a stable platform for this rear ultrasound.
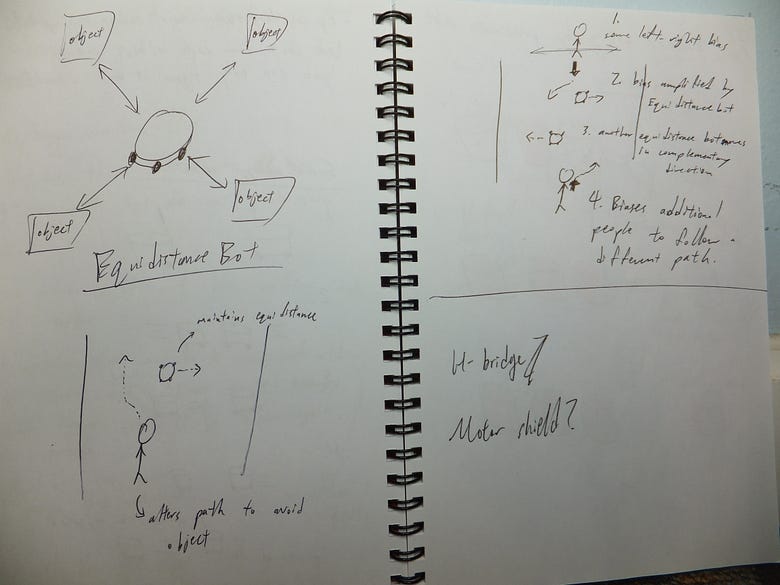
Equidistance mode
Adding the second ultrasound enabled us to program an extra movement pattern on top of the two that we previously discussed. In equidistance mode, SpaceMaker tries to stay as far away from all objects that surround it. The idea is that one SpaceMaker maintains equidistance, but a population of SpaceMakers creates social distance, as people moving and interacting in a space are tacitly encouraged to navigate around the robots.
Because our current robot design only support bidirectional distance sensing and movements, we achieved equidistance by sampling distances along a rotating axis. i.e., SpaceMaker rotates ~1 quadrant every few seconds and moves back and forth accordingly to find an equilibrium point.
Iteration #3 — Solving movement issues with more power and H-bridges
In our previous iteration, we tried to increase the size of traffic cones used. The goal was to completely cover the robotic base that moves the cone and see whether that design works out better. However, immediately after mounting cones that were taller than 9 inches, we found that the load was too heavy for SpaceMaker and our robot refused to move.
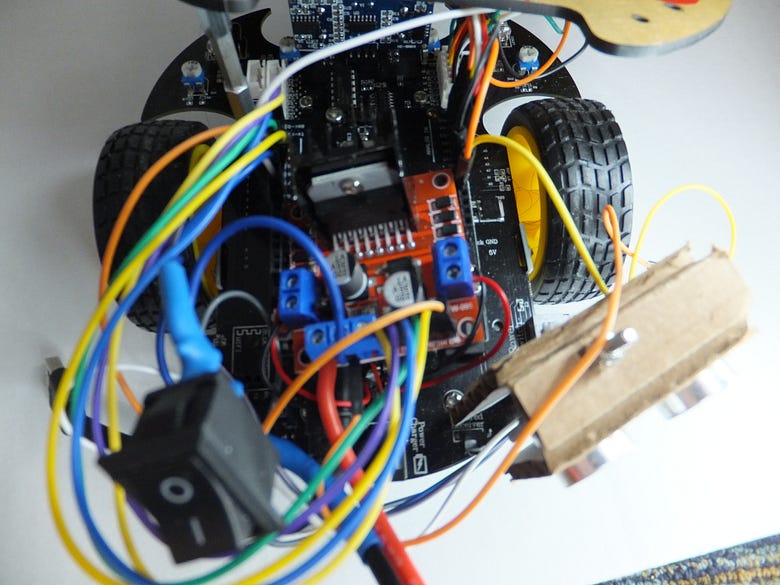
Reading up on DC motors and measuring the voltage being fed into the motors of our robot, we realised that the stalling issue was a result of too little power being supplied. We first tried to overcome this by connecting portable powerbanks to the arduino in addition to the 2 x 1.5V AA batteries powering the mobile base. This improved the situation, but was still insufficient. Next, we purchased a H-bridge so that we could power our motors directly with a separate power source. This H-bridge would then be controlled via connections to the Arduino.
Installing this H-Bridge gave us even more freedom with our power source. We first moved on to a 9V battery. Increasing the voltage of our power source seemed to allow our motors to spin faster and we declared a premature victory. But in terms of solving our mobility issues, we actually regressed here. Although we’d switched to 9V batteries, we were using alkaline batteries that discharge slowly. When there’s no load, this isn’t an issue. But under load, DC motors require a large current to overcome stalling, so alkaline batteries wouldn’t do.
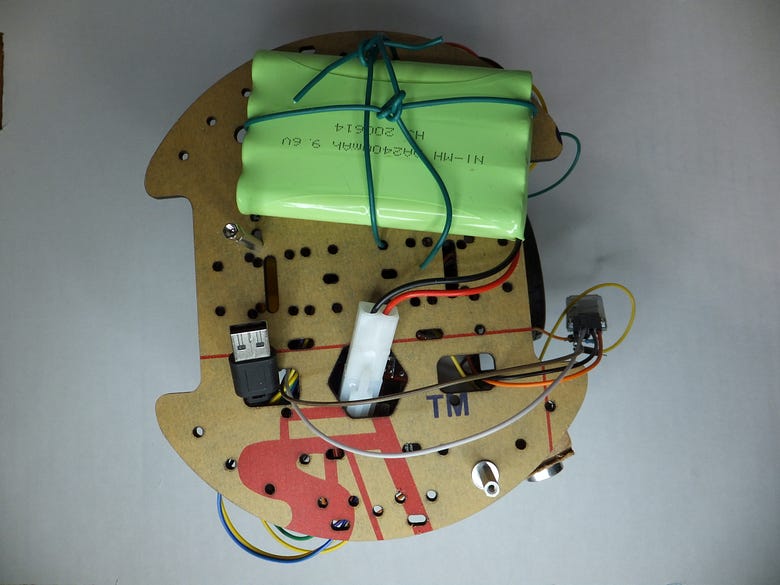
Switching to 2 x AA nickel metal hydride (NiMH) batteries, which discharge faster, showed improvements in the right direction so we scaled up to a 9.6V 2400mAh NiMH battery pack. The first time I plugged in this battery pack and saw how fast the robot ran, I laughed out of surprise. With that, our power management issues were resolved.
Iteration #3.1 — Safety concerns
As we added more power, I started thinking about ways to turn the power on and off with a switch. The initial reasoning was to preserve battery charge to maximise the voltage that SpaceMaker was receiving. But around the time that I switched to the NiMH battery pack, my circuits started to smoke, and I melted through wires on multiple occasions.
This was now a question of safety and before continuing work with the new battery packs, we made sure to first solder on a switch between the battery pack and the H-bridge. This gave us an emergency power cut-off every time something went wrong. Next, we had to prevent things from going wrong in the first place.
Going through my logs on the burnt wires, I noticed that it was always the same wire that melted: a thin wire that connected the ground of the H-bridge to the ground of the Arduino board. I spent some time thinking about how I could remove this wire from the circuit, but it was a necessary connection for the Arduino board to control the relays and pulse width modulators in the H-bridge. I roped in my housemate who’s majoring in engineering, but neither of us could figure out what was going wrong in the circuit. So in the end we decided that if the wires were melting because there was too much current flowing through, we simply had to increase the resistance of the wires. Playing around, we found that a 330 ohm resistor, plus the use of much longer wires, was sufficient to prevent further mishaps, while still allowing sufficient current to flow through.
Finally, there was electrical interference between the Arduino board and the H-bridge that caused various unexpected behaviours and short-circuits. This was resolved by separating the two circuit boards with a non-conducting material.
Iteration #4 — Going wireless
Following the previous iteration, SpaceMaker is finally able to move under load and we were free to move on to other interesting questions. At the start of this project, I was curious about how a population of SpaceMakers might change the pattern of human movement and interaction within a space. I was also curious about what applications could be developed if we had the ability to communicate between SpaceMakers and/or a command centre (which could be another SpaceMaker). So it was finally time to jump into Bluetooth communication.
The Bluetooth modules I’d purchased had come without any accompanying documentation. Thankfully they seemed like standard HC-05 modules, and by using the many tutorials, YouTube videos, and fora available, we managed to set up a Bluetooth connection between our Arduino and a laptop/smartphone.
This was also the stage where we were pretty familiar with the system and its shortcomings, so we also made many other tweaks. For example, adjusting the length of spacers below the robot to improve the balance provided by ball bearings; removing the default wires to the mobile chassis and simplifying the wiring for our sensors and actuators; adding a platform above the circuit boards to protect the wiring as well as provide a stable base for holding the battery packs and loose components in place.
Iteration #4.1 On-the-fly pulse-width modulation
As our prototype became more fleshed out and the deadline for the final video drew nearer, we had to start testing out SpaceMaker in different terrains. However, outdoor terrains were challenging because slopes and debris would often cause SpaceMaker to stall. Thankfully, we’d just spent weeks scaling up the amount of power available to our DC motors, so stalling issues could now be solved by increasing the power supplied to each motor via pulse-width modulation (PWM) according to their performance.
To improve the convenience of fine-tuning the PWM as well as to add the ability to adjust the PWM as we moved from terrain to terrain, I added a switch to the Bluetooth input loop. Now, in addition to movement commands, we could simply send numeric characters to SpaceMaker via Bluetooth in order to adjust the power being sent to each motor. It’s a little crude, but it worked for our circumstances.
void check_bt() {
  if (EEBlue.available()) {
    char bt_val = EEBlue.read();
    switch(bt_val) {
      ...
      case '2':
        l_power += 25;
        analogWrite(pwm_l, l_power);
        break;
      case '1':
        l_power -= 5;
        analogWrite(pwm_l, l_power);
        break;
      case '9':
        r_power += 25;
        analogWrite(pwm_r, r_power);
        break;
      case '8':
        r_power -= 5;
        analogWrite(pwm_r, r_power);
        break;
    }
  }
}
Creating the demo video
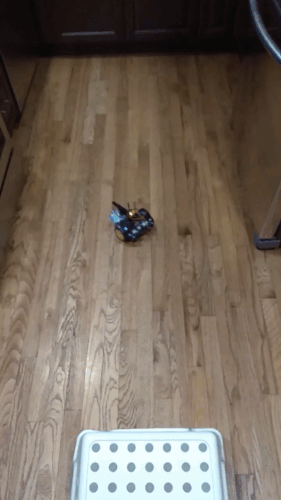
At this point, we had a working prototype and it was time to create a demo video. Throughout the prototyping process, I had thought of SpaceMaker as a social distancing robot, as originally envisioned. However, as we worked on the prototype and the various technical challenges came to light, it became clear that we would need a lot more technical progress (most notably, the ability to use multiple SpaceMakers and/or more complicated sensing patterns) before some of these ideas become feasible. I also wasn’t convinced that social distancing was the right use case for this robot, and slowly lost interest in that idea.
Then, after many nights spent thinking about this, I started to wonder whether SpaceMaker could be used to expand the range of use cases for existing traffic cones. This eventually led to the idea of proximity-based traffic cones in parking lots that would enable users such as homeowners, pass holders, and handicapped drivers to reserve parking spaces.
I also drew inspiration from a colleague’s project for a smart sign. I thought that it would be interesting to make a mobile version of the smart sign, which would be a natural extension of SpaceMaker’s current design because traffic cones already serve as a form of warning, and we had already established a wireless connection between SpaceMaker and smartphones.
Finally, there was the actual filming of these ideas. This turned out to be a productive process in terms of ideation. When explaining the concept of the video to my film crew (my housemates), I needed to pinpoint the ideas that I wanted to convey and the scenes we would need to achieve this. At the same time, the team pointed out where some ideas didn’t make much sense, or where they could be improved or better presented. In the process, the concepts being presented became much more refined compared to my original rough story board. This goes to show how we slowly become over familiar with a concept while we work, which makes us blind to various shortcomings. In times like these, outside perspectives are imperative to improve the design and communication of an idea.
Future directions
As the semester came to a close, we had to start wrapping up our projects. However, if there were one truism that we’ve learnt from this course, it would be that every iteration informs the next iteration. True enough, after making my final prototype and hearing my colleagues’ critiques, I’m left with many ideas to try out. Someday, if I have the itch to work on a hardware project again, I might well implement some of these improvements. But for now here are my thoughts.
Form
Throughout the development of SpaceMaker, there has been consistent feedback on how its form could be experimented with or improved. In particular, the size of the traffic cone that SpaceMaker uses could make a big difference in how it’s read. Previously we faced various constraints with the size of the cones we could use with SpaceMaker because heavy loads made the robot stall. However, now that the motor issues have been resolved, we’re freed up to experiment.
What would happen if SpaceMaker was completely enveloped in a traffic cone? In this case, people would either expect SpaceMaker to be an ordinary traffic cone; or, when they’ve had enough interactions with SpaceMaker, they might start assuming that every traffic cone around them has the potential for movement. To try out this idea, we would either have to purchase a large enough traffic cone (a full 28″ cone perhaps?), or construct such a cone. We could then use one of our earlier mounting systems to attach this cone to SpaceMaker, then attach its ultrasound sensors to the exterior surface of the cone, or drill holes for the ultrasound sensors.
Multiple robots + collective behaviour
One of the original goals for this project was to have multiple SpaceMaker bots interacting and communicating with each other. It eventually became clear that there were other pressing issues to work on before this would be possible, so this idea was shelved for the time being. However, I believe this is still an interesting problem, and one rich with possibilities. Thinking through some of the ideas in collective animal behaviour, a mobile Arduino with a distance sensor should be more than capable of producing rich collective behaviour patterns. We wouldn’t even need to enable Bluetooth communication between each SpaceMaker unit. It would be interesting to explore some theoretical questions in this area, as well as translate them to some productive application.
Mechanical improvements
Watching SpaceMaker move, it’s immediately noticeable that it moves in fits and starts. Moreover, because it brakes abruptly, it is prone to falling over when moving on a slope. As it is, the mechanical issues currently limit the potential use cases for SpaceMaker. Even for the use cases presented in the demo video, multiple takes had to be filmed because SpaceMaker would occasionally move erratically or tip itself over. However, some colleagues mentioned that this motion was endearing and I do agree that I would like some of this character to remain in future iterations. A natural solution to this dilemma would be to solve the mechanical issues that SpaceMaker currently faces, then add human-like movements afterwards. Some potential ideas are discussed below.
- Smoother pulse-width modulation. One reason for the jerky movements is that we currently only have one power setting for movement. This means that starting and stopping motions are all-or-nothing and thus abrupt. If we instead slowly ramped up the power and then tapered it off as a movement starts and stops, then SpaceMaker would also move more smoothly.
- Add a gearbox. Even if we could taper off the power fed to our motors as a movement ends, the start of a movement still poses a challenge. DC motors, under load and in a high friction environment, require a lot of current to avoid stalling. This means that slowly ramping up power wouldn’t produce a smooth start because the robot wouldn’t even be able to start moving until a threshold is reached. And once that threshold is reached, we start moving abruptly and quickly. To solve this, we can use a gearbox with a high gear ratio when a movement begins. This ensures that we can smoothly generate sufficient torque to move even at slow starting speeds.
- Larger wheels. Currently, due to the small diameter of the wheels, cracks and bumps cause SpaceMaker to stumble and even stall. Larger wheels would address this problem, however they can only be installed in tandem with adding a gearbox, otherwise we wouldn’t be able to generate sufficient torque to move.
- Improved weight distribution. To improve the overall balance of SpaceMaker, we can either increase the diameter of the base, or shift its centre of gravity downwards. We could lower its centre of gravity by shifting heavier components such as the two battery packs down onto the base chassis. Another option would be to add ballast to the robot.
Final remarks
Coming from a software background, I was caught completely off guard by the complexities involved in working with hardware. On top of working with ideas and code, there were questions of design, material, weight, circuits, power, and all sorts of other physical considerations to take note of. In light of all this complexity, it was very important to move back-and-forth, side-to-side, from rough sketches to higher and higher resolution prototypes. Otherwise the challenges would have felt overwhelming.
This has been a rich lesson in ideation and prototyping and I hope to carry this experience into the many projects and discussions to come in life.
Originally published at github.com.